Instructions for signing documents with qualified electronic signature in Adobe Acrobat Reader DC: Разлика между версии
Редакция без резюме |
|||
| (Не са показани 43 междинни версии от същия потребител) | |||
| Ред 1: | Ред 1: | ||
__TOC__ | __TOC__ | ||
=Instructions for the current version of Adobe Acrobat Reader DC= | |||
Signing PDF files with Acrobat Reader DC v. | Signing PDF files with Acrobat Reader DC v.2024.002.20991 or newer. | ||
*You can download the program from '''[https://get.adobe.com/reader/ HERE]''' | *You can download the program from '''[https://get.adobe.com/reader/ HERE]''' | ||
'''[http://repository.infonotary.com/ra/Instructions/PDF_Signing_Instruction_ENG_1.1.pdf Manual setting]''' | |||
'''VIDEO INSTRUCTION FROM THE NEW ACROBAT READER INTERFACE''' | |||
<html> | |||
<video width="800" height="450" controls> | |||
<source src="https://repository.infonotary.com/ra/Media/AdobeAcrobat/NewAcrobatReaderSignInstruction.mp4" type="video/mp4"> | |||
Your browser does not support the video tag. | |||
</video> | |||
== | </html> | ||
'''VIDEO INSTRUCTION FROM THE PREVIOUS ACROBAT READER INTERFACE''' | |||
<html> | |||
<video width="800" height="450" controls> | |||
<source src="https://repository.infonotary.com/ra/Media/AdobeAcrobat/AcrobatReaderSignInstruction.mp4" type="video/mp4"> | |||
Your browser does not support the video tag. | |||
</video> | |||
</html> | |||
==Security setting import== | |||
'''THE SETTING IS IMPORTANT FOR REMOTE RENEWAL/REISSUE OF CERTIFICATE''' | '''THE SETTING IS IMPORTANT FOR REMOTE RENEWAL/REISSUE OF CERTIFICATE''' | ||
1. From | * <span style="color:#ff0000;">'''IMPORTANT:'''</span> Make sure that you already download the file - [https://repository.infonotary.com/ra/Instructions/SecuritySettings2.acrobatsecuritysettings '''SecuritySettings2.acrobatsecuritysettings'''], which contains all the necessary settings. | ||
* <span style="color:#ff0000;">'''IMPORTANT:'''</span> Do not attempt to open the '''SecuritySettings2.acrobatsecuritysettings''' file directly, you must import it through Acrobat Reader. | |||
1. From '''Menu''', select '''Preferences''' (new interface) / From '''Edit''', select '''Preferences''' (old interface) | |||
[[Файл:AcrobatReader1.png|750px]] [[Файл:Pdf11.png|750px]] | |||
2. From '''Security''' select '''Import''' | |||
[[Файл:AcrobatReader2.png|750px]] | |||
With the correct path to the [https://repository.infonotary.com/ra/Instructions/SecuritySettings2.acrobatsecuritysettings '''SecuritySettings2.acrobatsecuritysettings'''] file, a window will be displayed to make the required setting. | |||
3. Select '''Import''' | |||
[[Файл:AcrobatReader3.png|750px]] | |||
==Signing documents== | |||
1. From '''All Tools''', '''View more''' select '''Use a Certificate''' (new interface) / From '''Tools''' select '''Certificates''' (old interface) | |||
[[Файл:AcrobatReader4.png|750px]] [[Файл:Pdf2.png|750px]] | |||
2. Press '''Digitally Sign''', then use your mouse, click drag and draw the area where you would like the signature to appear | |||
[[Файл:AcrobatReader5.png|750px]] [[Файл:Pdf3.png|600px]] | |||
3. You will be asked to choose the certificate, which you want to use for signing and press '''Continue''', after that press button '''Sign''' | |||
[[Файл:AcrobatReader6.png|750px]] [[Файл:AcrobatReader7.png|750px]] | |||
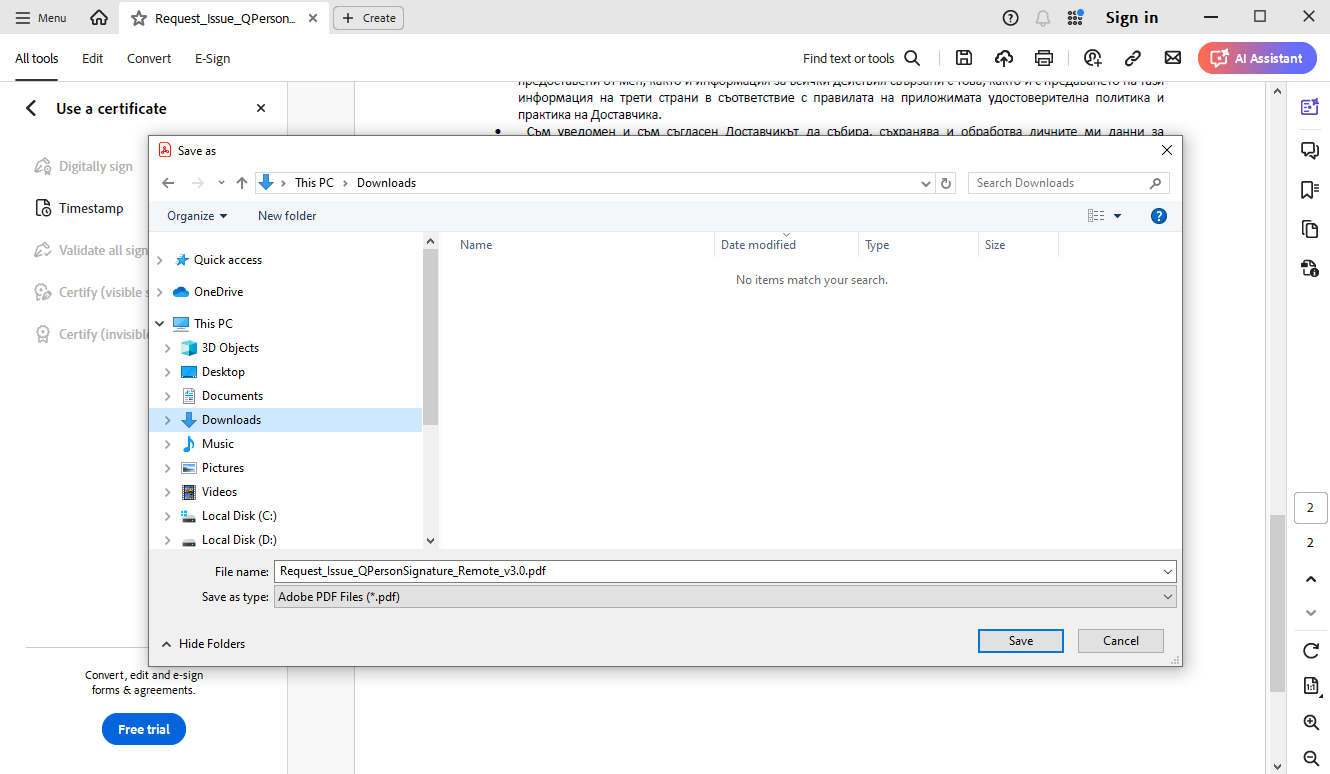
4. After you choose your certificate you will be asked to save or overwrite the file. It will appear a window, which will ask you for the PIN | |||
[[Файл:AcrobatReader8.png|750px]] [[Файл:AcrobatReader9.png|750px]] | |||
5. In the area you've draw it will visualize the names of the signer, date and time of the signing | |||
[[Файл:AcrobatReader10.png|750px]] | |||
=== Manually import a library for smart card=== | |||
==== Manually import in Windows ==== | |||
'''THIS SETTING IS NECESSARY ONLY IF YOUR CERTIFICATE IS NOT VISUALIZED WHEN ATTEMPTING TO SIGN OR THE PIN CODE WINDOW IS NOT SHOWING!''' | |||
1. From '''Menu''', select '''Preferences''' (new interface) / From '''Edit''', select '''Preferences''' (old interface) | |||
[[Файл:AcrobatReader1.png|750px]] [[Файл:Pdf11.png|750px]] | |||
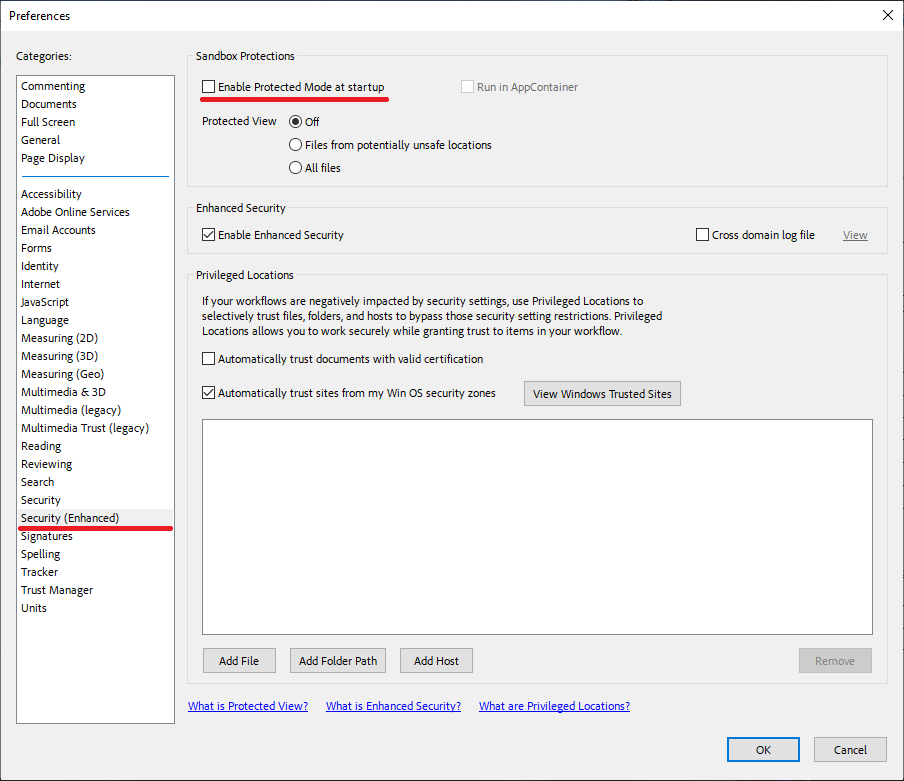
2. Select category '''Security (Enhanced)''' and uncheck "'''Enable Protected Mode at startup'''" after that restart Adobe Acrobat Reader DC | |||
[[Файл: | [[Файл:AcrobatReader11.png|750px]] | ||
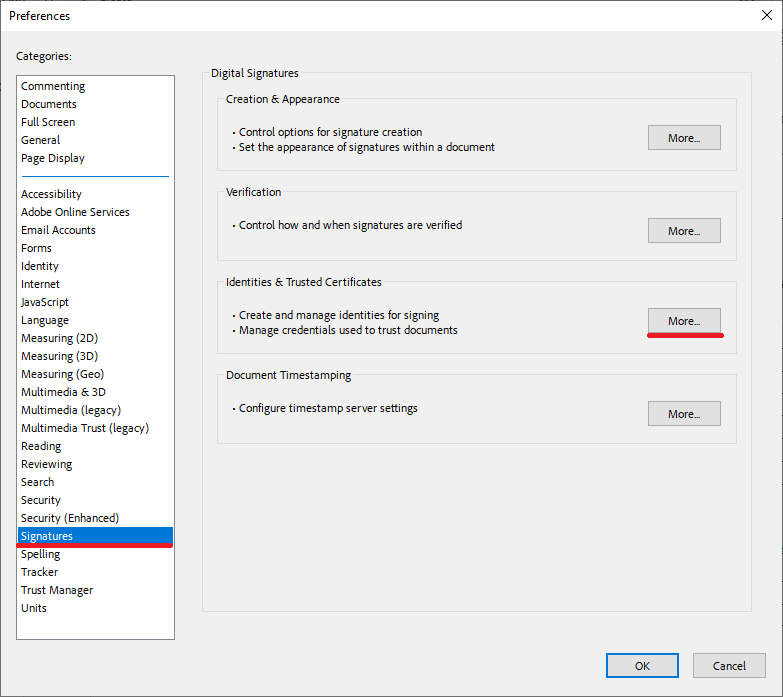
3. From the '''Signatures''' category select '''More''' for '''Identities & Trusted certificates'''. | |||
[[Файл:AcrobatReader12.png|750px]] | |||
4. From '''Digital IDs''' select '''PKCS#11 Modules and Tokens'''. | |||
Choose '''Attach Module''' and specify the path to your smart card library.. | |||
[[Файл:AcrobatReader13.png|750px]] | |||
Path to library for '''Windows:''' | |||
* '''IDPrime''' - C:\WINDOWS\system32\eTPKCS11.dll | |||
<!--* '''Siemens''' - C:\WINDOWS\system32\siecap11.dll--> | |||
* '''Bit4ID''' - C:\WINDOWS\system32\bit4ipki.dll | |||
* '''Charismathics''' - C:\WINDOWS\system32\cmP11.dll | |||
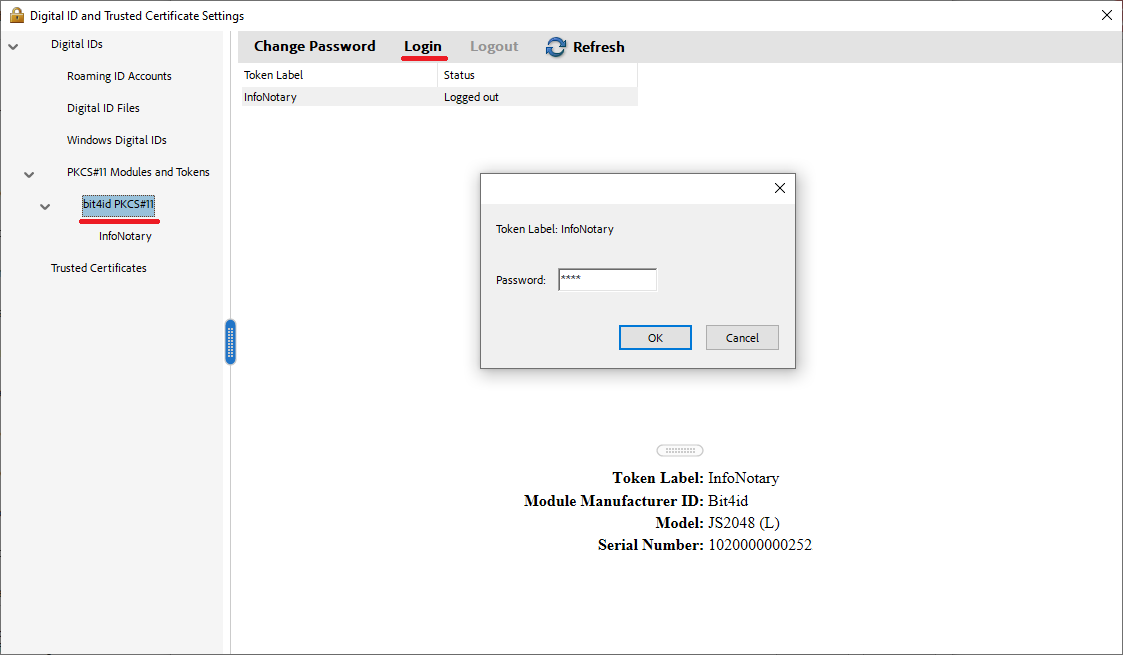
5. If set up correctly, information about your smart card will appear.. | |||
Highlight your smart card and press '''Login'''. Enter your PIN code, then [http://wiki.infonotary.com/index.php?title=Instructions_for_signing_documents_with_qualified_electronic_signature_in_Adobe_Acrobat_Reader_DC#Signing_documents attempt to sign]. | |||
[[Файл: | [[Файл:AcrobatReader14.png|750px]] | ||
==== Manually import in macOS ==== | |||
'''THIS SETTING IS NECESSARY ONLY IF YOUR CERTIFICATE IS NOT VISUALIZED WHEN ATTEMPTING TO SIGN OR THE PIN CODE WINDOW IS NOT SHOWING!''' | |||
1. From menu '''Adobe Reader''' choose '''Preferences'''. | |||
[[Файл: | [[Файл:AdobeAcrobatMacOS.png|750px]] | ||
2. Choose category '''Signatures''' and click '''More''' from section '''Identities & Trusted certificates'''. | |||
[[Файл:AdobeAcrobatMacOS2.png|750px]] | |||
3. From '''Digital IDs''' select '''PKCS#11 Modules and Tokens''', press the button '''Attach module''' and enter the path to the library for your smart card. | |||
[[Файл: | [[Файл:AdobeAcrobatMacOS3.png|750px]] | ||
Path to library for '''macOS:''' | |||
* '''IDPrime''' - /Library/Frameworks/eToken.framework/Versions/A/libIDPrimePKCS11.dylib | |||
<!--* '''Charismathics''' - /Applications/Charismathics/libcmP11.dylib--> | |||
* '''Bit4id''' - /Library/bit4id/pkcs11/libbit4ipki.dylib | |||
* '''OpenSC''' - /Library/OpenSC/lib/opensc-pkcs11.so | |||
[ | <!--* In case you do not know the model of your smart card, call our support to help you or use our [http://repository.infonotary.com/install/sysinfo/SystemInfo.dmg tool] for testing installation.'''--> | ||
4. If set correctly, the model of your card will be displayed. | |||
[[Файл: | * Select your card and click '''Login'''. Dial your PIN to change the status to '''Logged in'''. | ||
[[Файл:AdobeAcrobatMacOS4.png|750px]] | |||
Текуща версия към 12:58, 26 август 2024
Instructions for the current version of Adobe Acrobat Reader DC
Signing PDF files with Acrobat Reader DC v.2024.002.20991 or newer.
- You can download the program from HERE
VIDEO INSTRUCTION FROM THE NEW ACROBAT READER INTERFACE
VIDEO INSTRUCTION FROM THE PREVIOUS ACROBAT READER INTERFACE
Security setting import
THE SETTING IS IMPORTANT FOR REMOTE RENEWAL/REISSUE OF CERTIFICATE
- IMPORTANT: Make sure that you already download the file - SecuritySettings2.acrobatsecuritysettings, which contains all the necessary settings.
- IMPORTANT: Do not attempt to open the SecuritySettings2.acrobatsecuritysettings file directly, you must import it through Acrobat Reader.
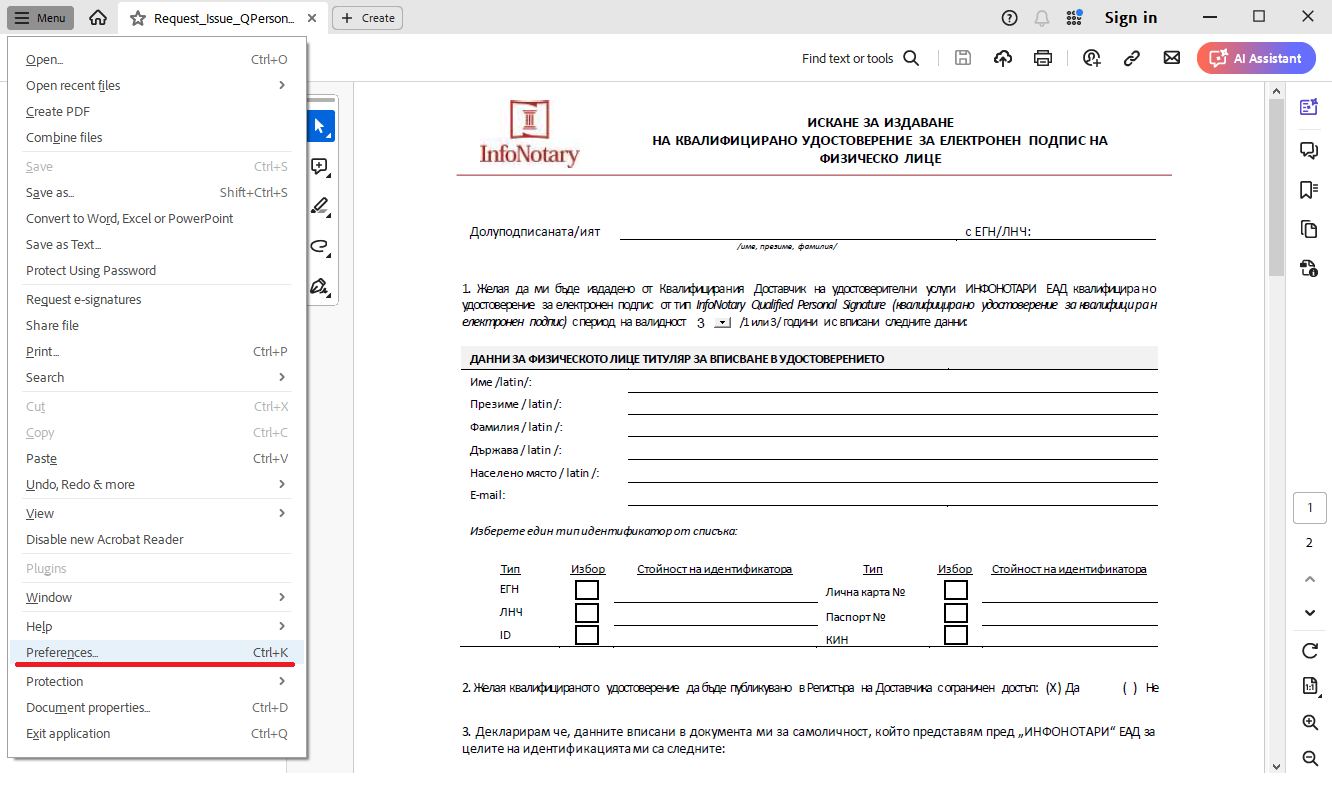
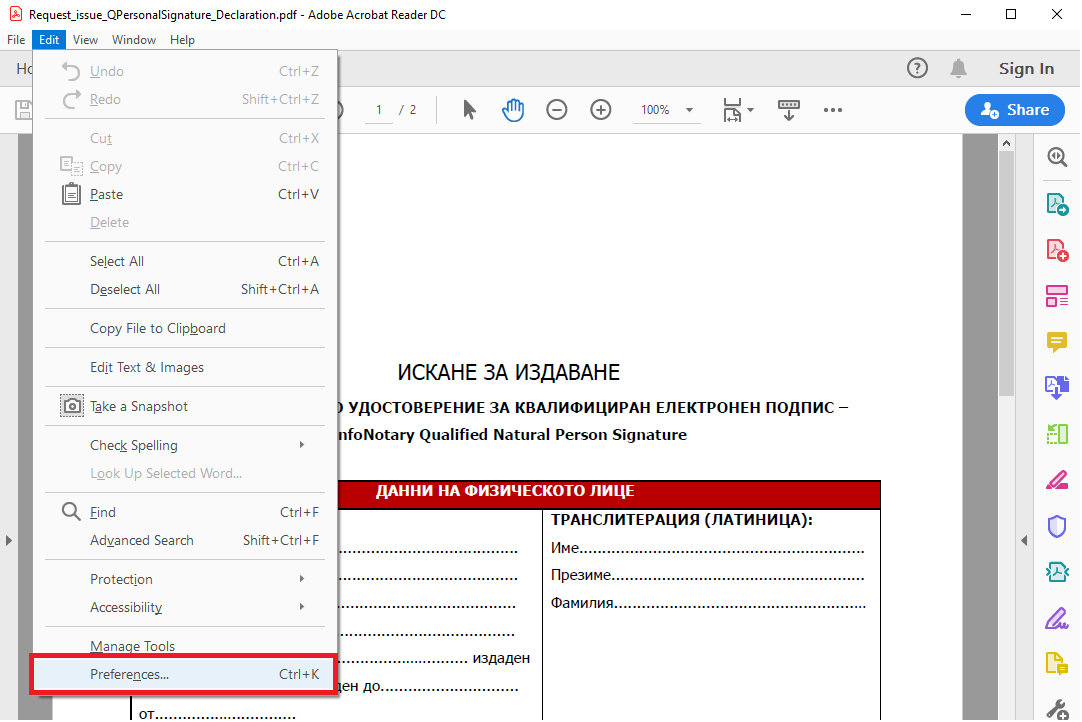
1. From Menu, select Preferences (new interface) / From Edit, select Preferences (old interface)
2. From Security select Import
With the correct path to the SecuritySettings2.acrobatsecuritysettings file, a window will be displayed to make the required setting.
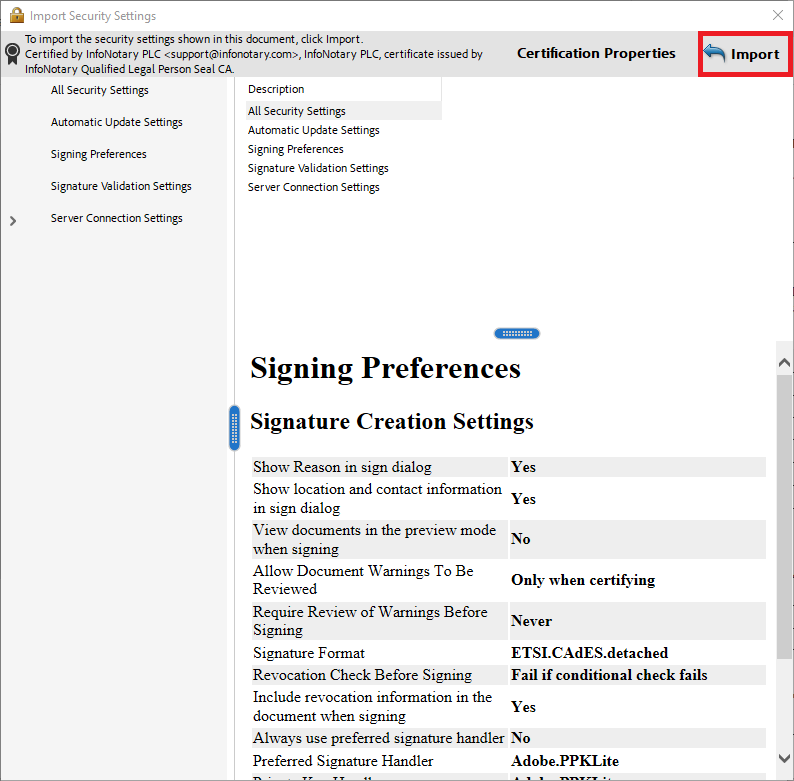
3. Select Import
Signing documents
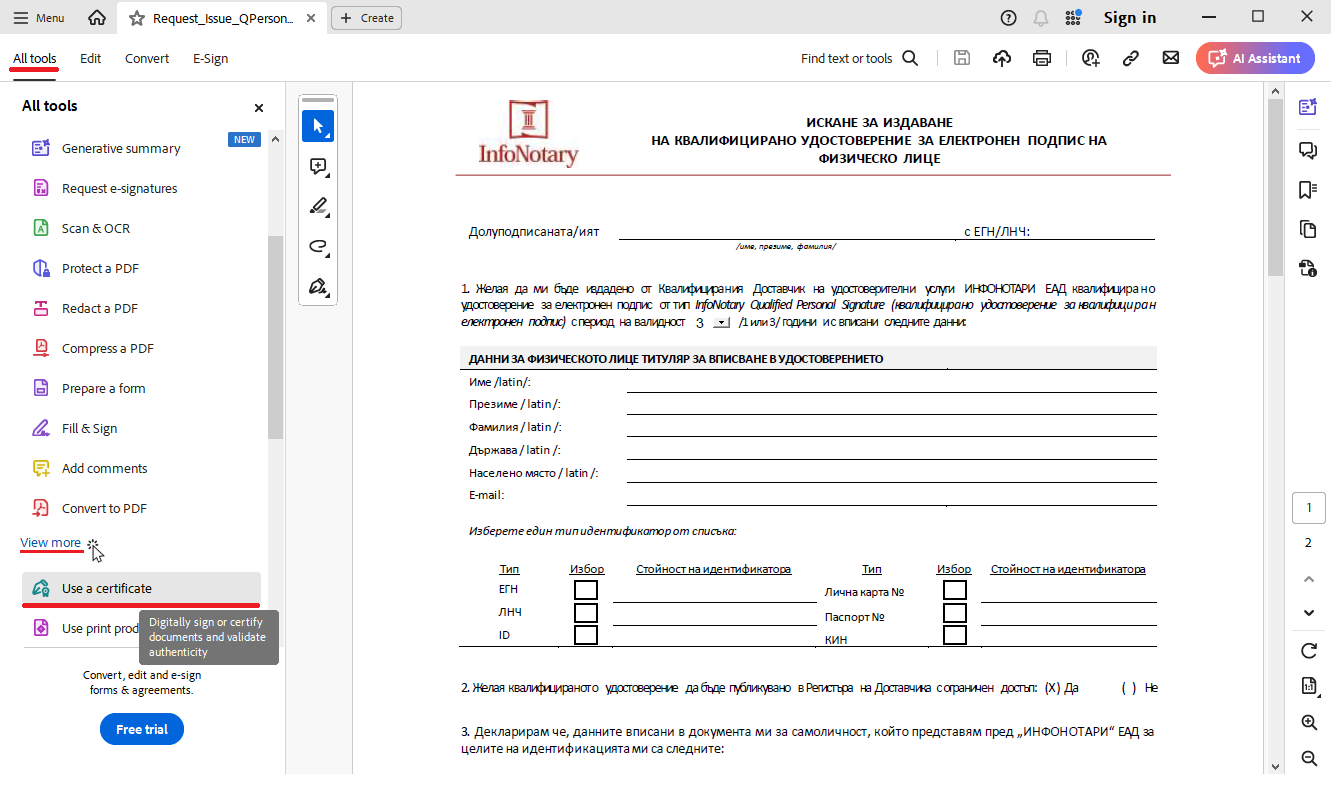
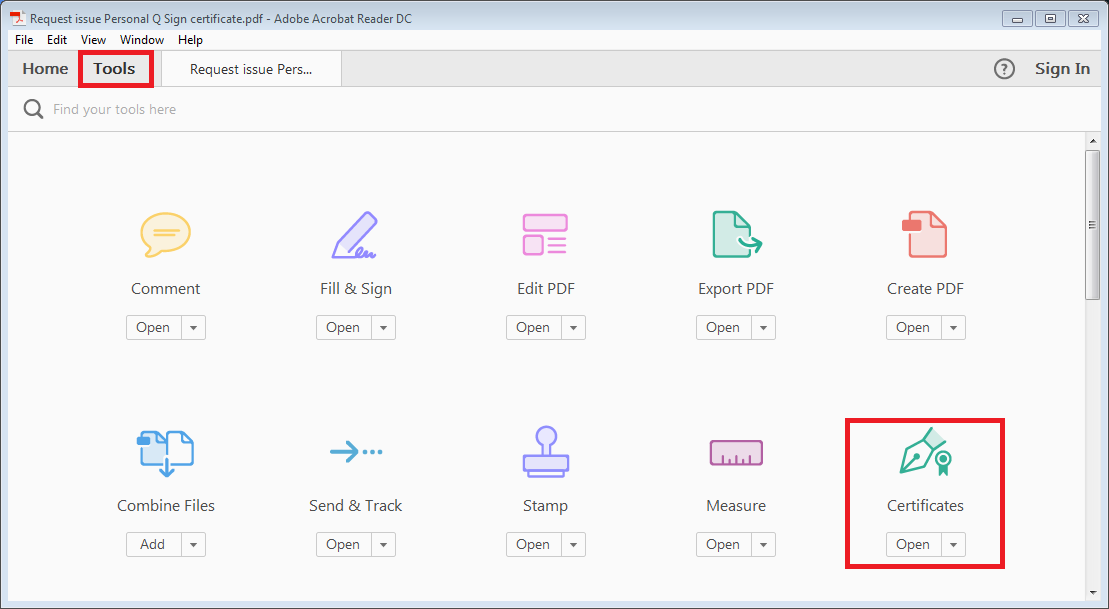
1. From All Tools, View more select Use a Certificate (new interface) / From Tools select Certificates (old interface)
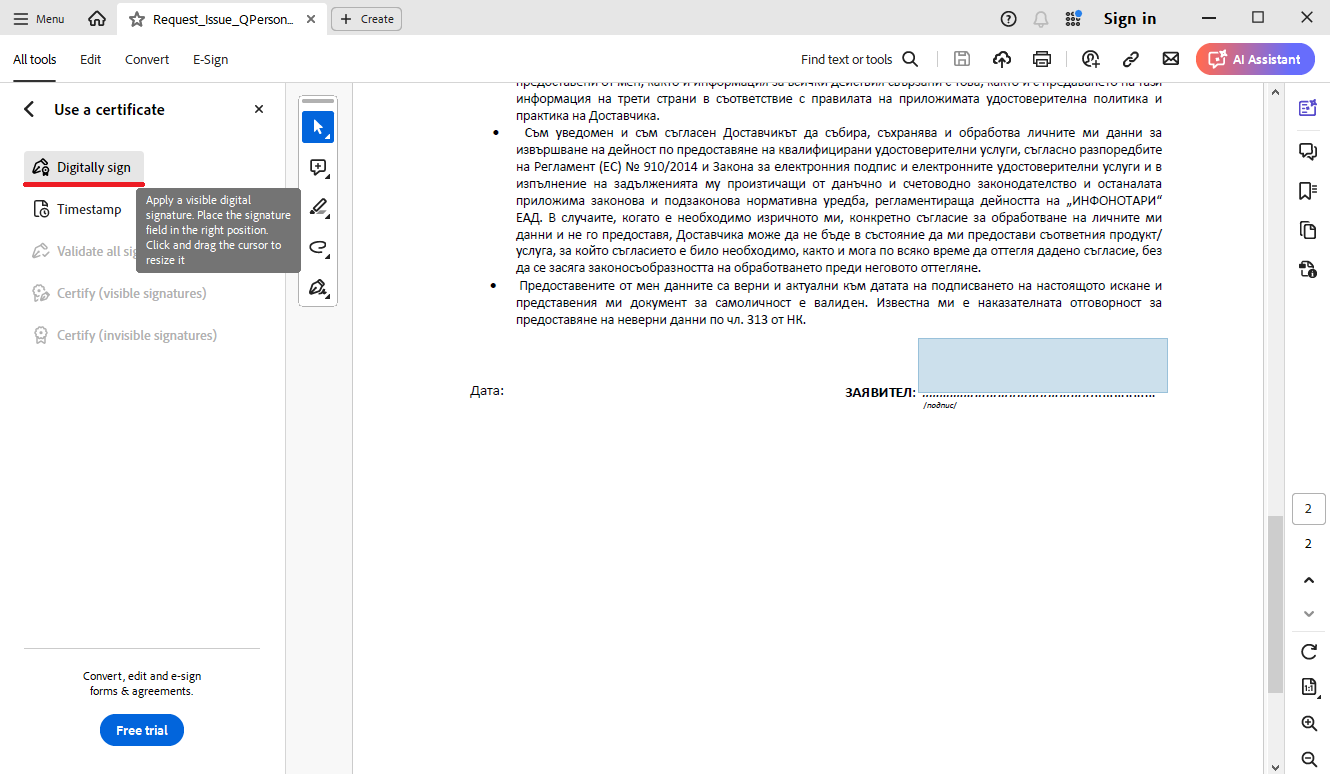
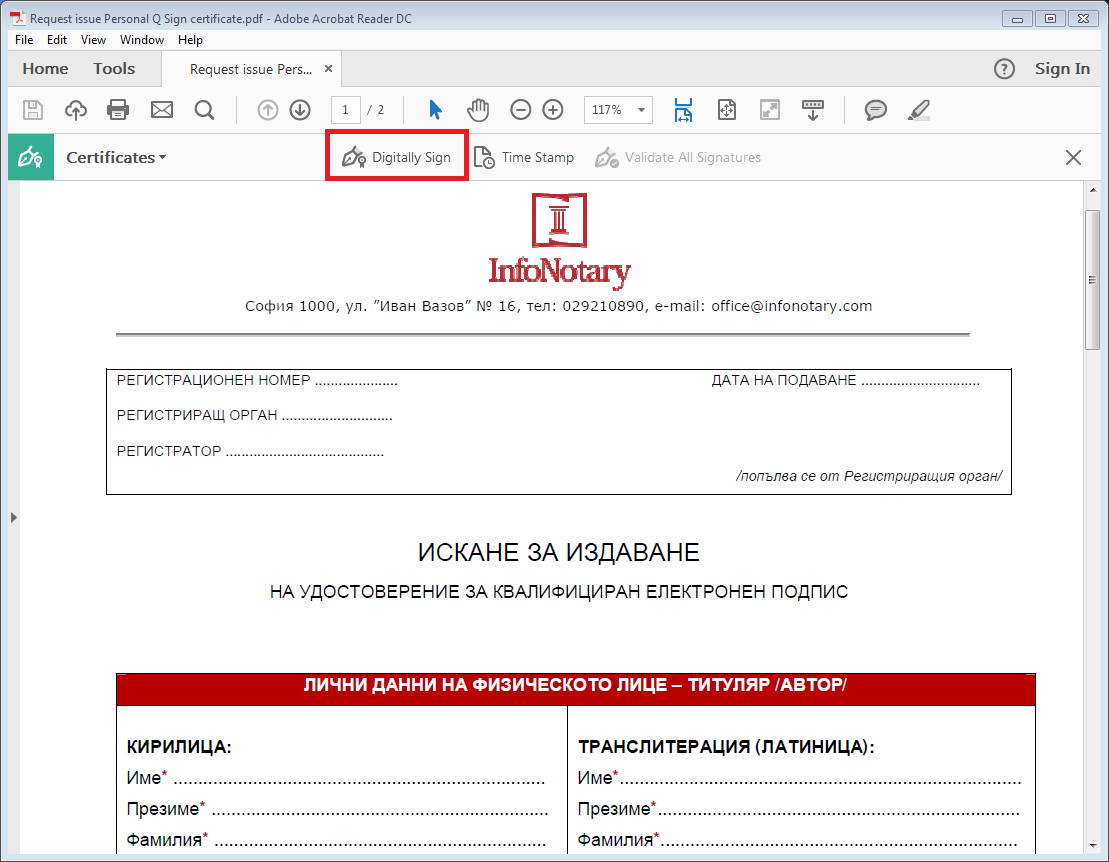
2. Press Digitally Sign, then use your mouse, click drag and draw the area where you would like the signature to appear
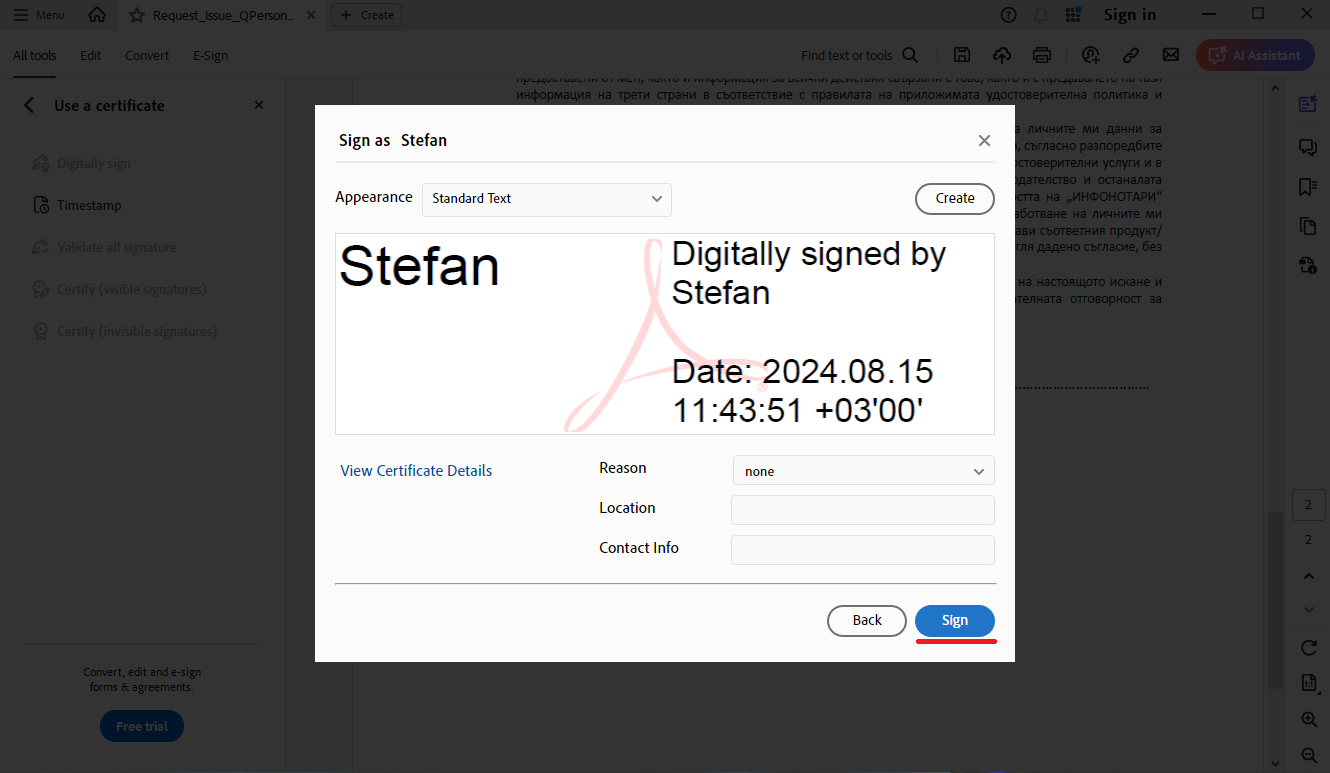
3. You will be asked to choose the certificate, which you want to use for signing and press Continue, after that press button Sign
4. After you choose your certificate you will be asked to save or overwrite the file. It will appear a window, which will ask you for the PIN
5. In the area you've draw it will visualize the names of the signer, date and time of the signing
Manually import a library for smart card
Manually import in Windows
THIS SETTING IS NECESSARY ONLY IF YOUR CERTIFICATE IS NOT VISUALIZED WHEN ATTEMPTING TO SIGN OR THE PIN CODE WINDOW IS NOT SHOWING!
1. From Menu, select Preferences (new interface) / From Edit, select Preferences (old interface)
2. Select category Security (Enhanced) and uncheck "Enable Protected Mode at startup" after that restart Adobe Acrobat Reader DC
3. From the Signatures category select More for Identities & Trusted certificates.
4. From Digital IDs select PKCS#11 Modules and Tokens.
Choose Attach Module and specify the path to your smart card library..
Path to library for Windows:
- IDPrime - C:\WINDOWS\system32\eTPKCS11.dll
- Bit4ID - C:\WINDOWS\system32\bit4ipki.dll
- Charismathics - C:\WINDOWS\system32\cmP11.dll
5. If set up correctly, information about your smart card will appear..
Highlight your smart card and press Login. Enter your PIN code, then attempt to sign.
Manually import in macOS
THIS SETTING IS NECESSARY ONLY IF YOUR CERTIFICATE IS NOT VISUALIZED WHEN ATTEMPTING TO SIGN OR THE PIN CODE WINDOW IS NOT SHOWING!
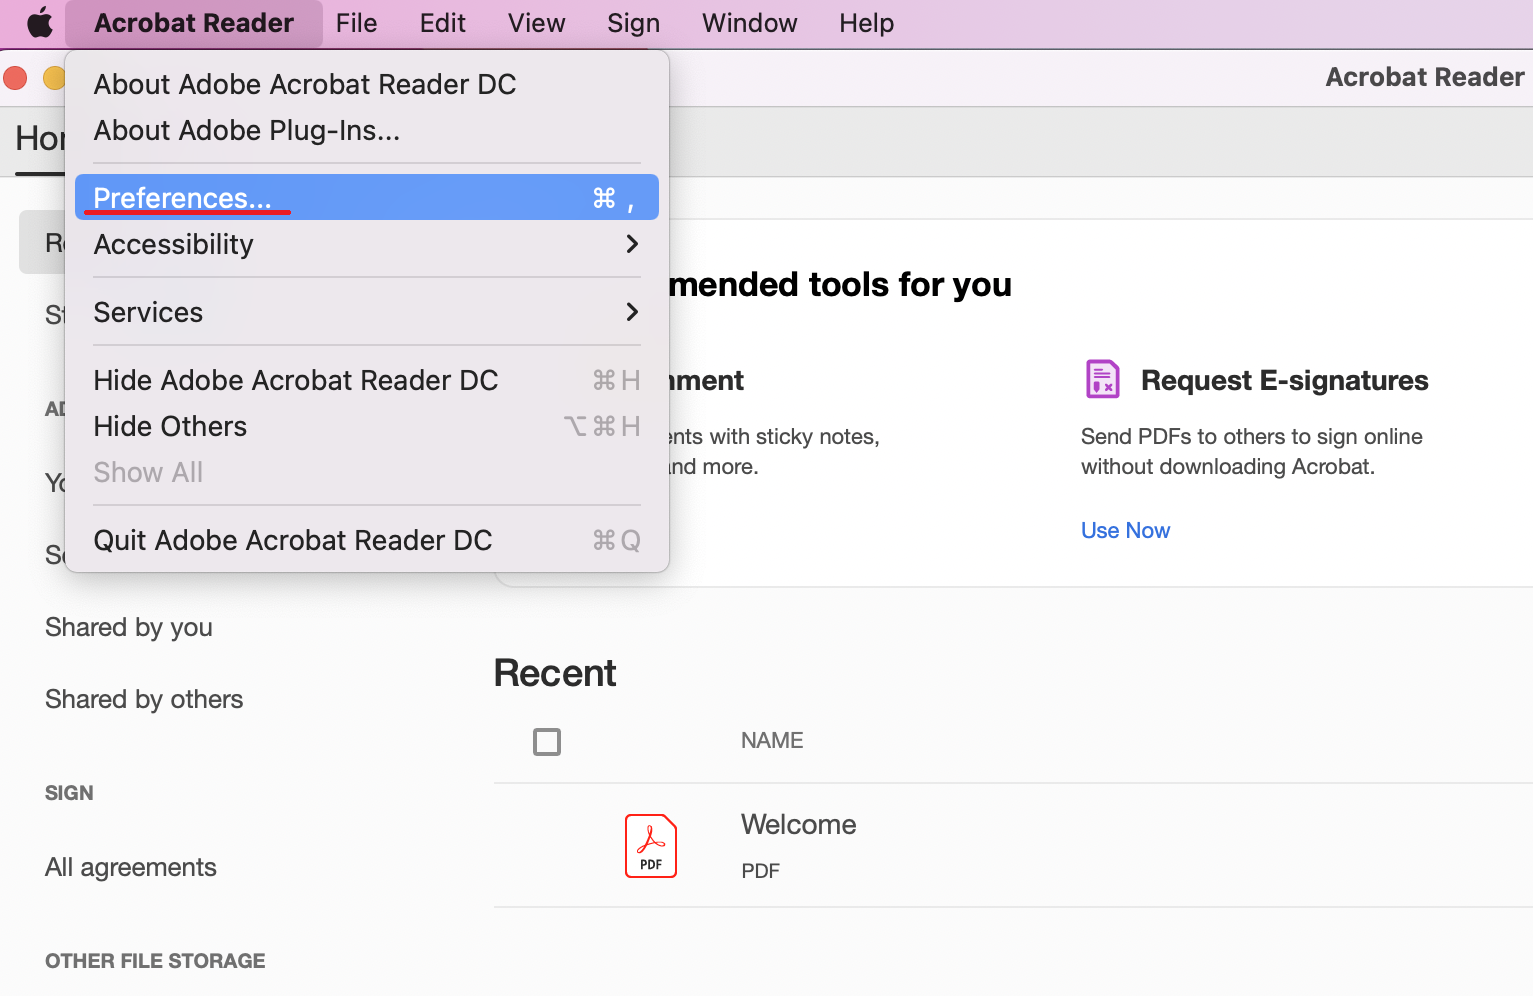
1. From menu Adobe Reader choose Preferences.
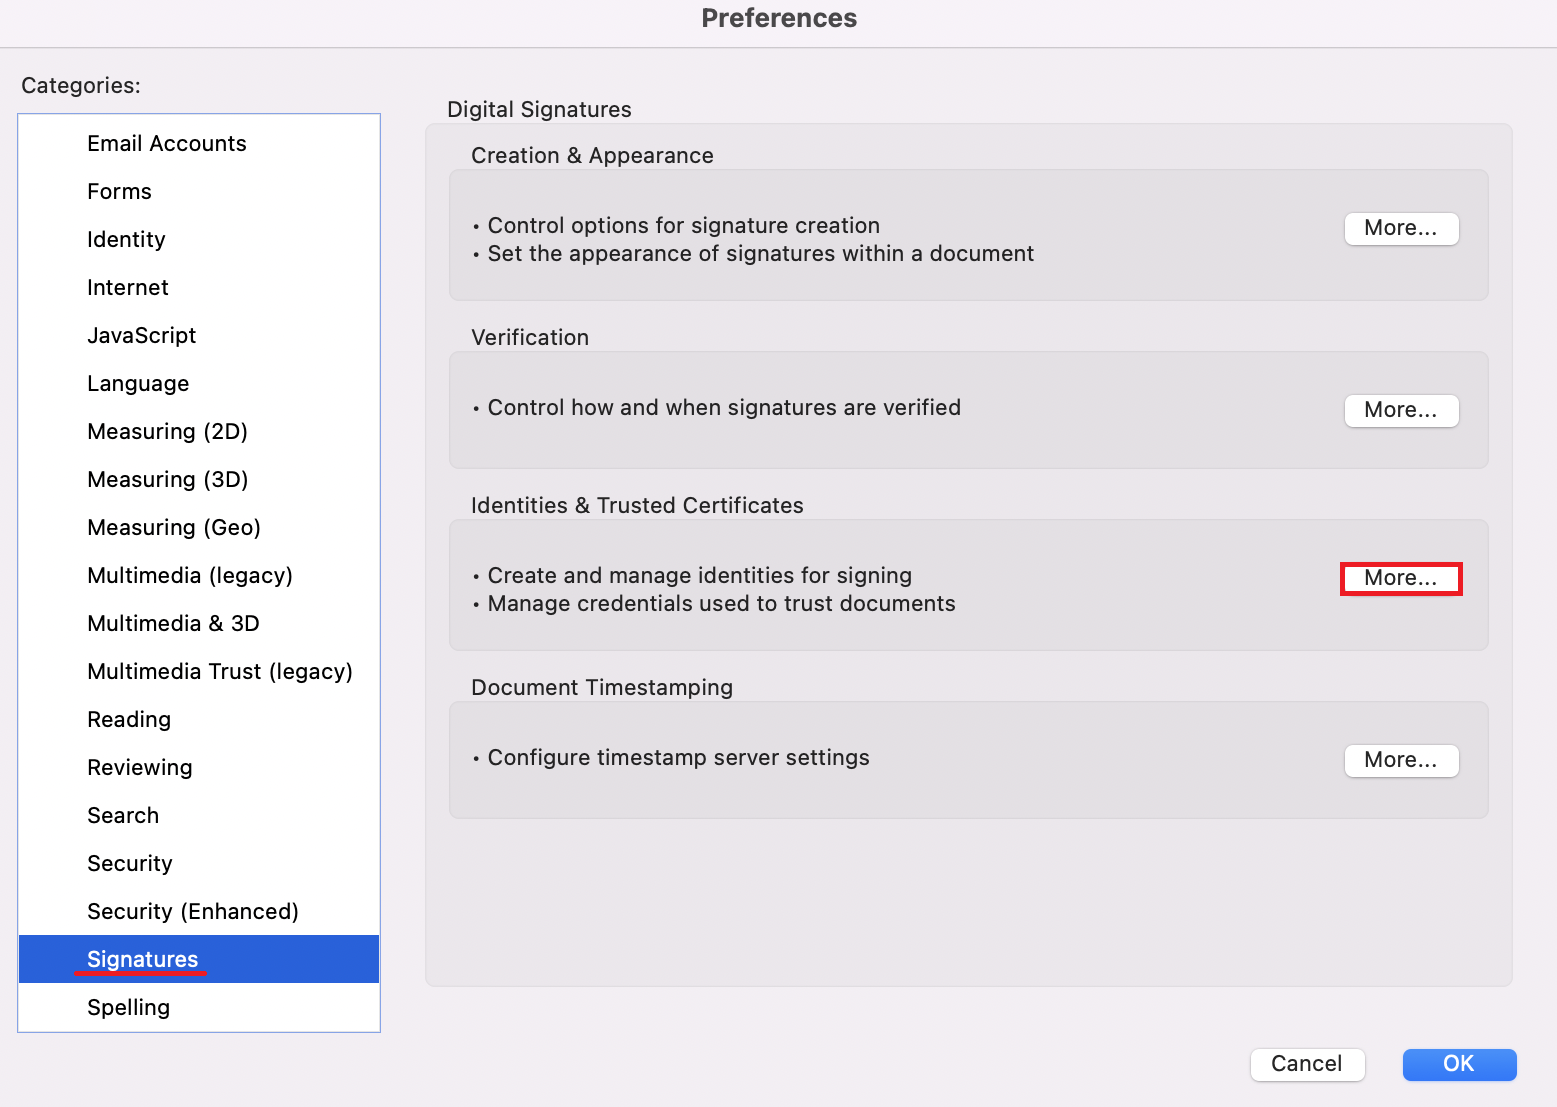
2. Choose category Signatures and click More from section Identities & Trusted certificates.
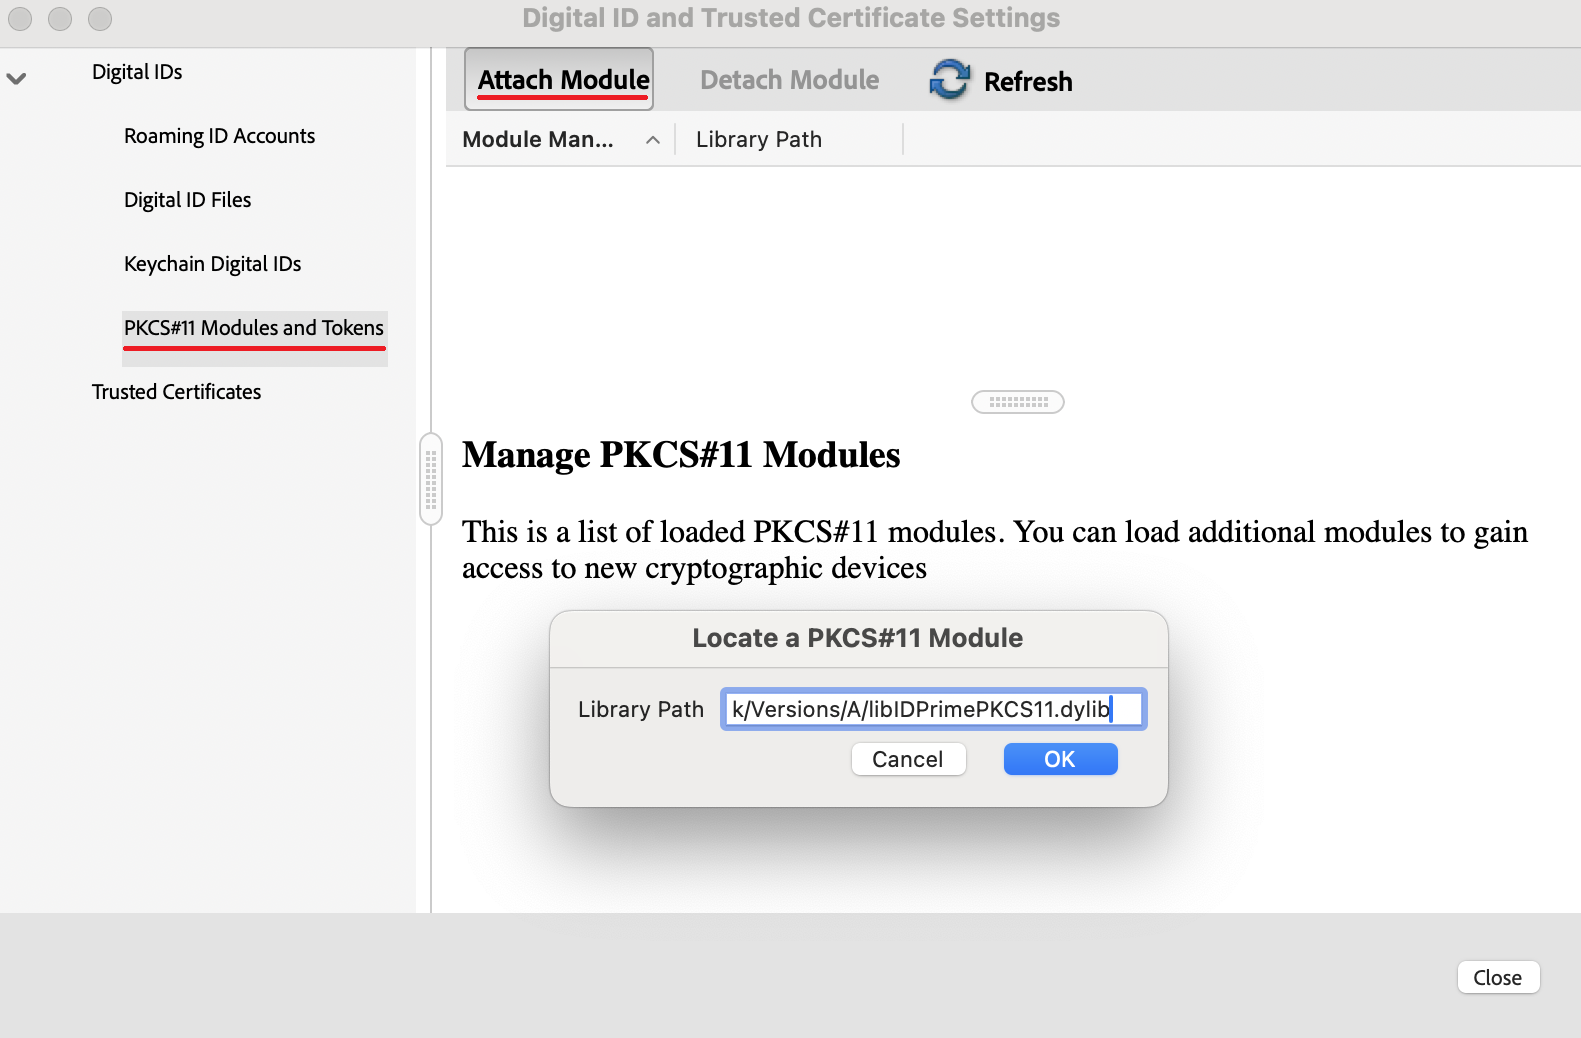
3. From Digital IDs select PKCS#11 Modules and Tokens, press the button Attach module and enter the path to the library for your smart card.
Path to library for macOS:
- IDPrime - /Library/Frameworks/eToken.framework/Versions/A/libIDPrimePKCS11.dylib
- Bit4id - /Library/bit4id/pkcs11/libbit4ipki.dylib
- OpenSC - /Library/OpenSC/lib/opensc-pkcs11.so
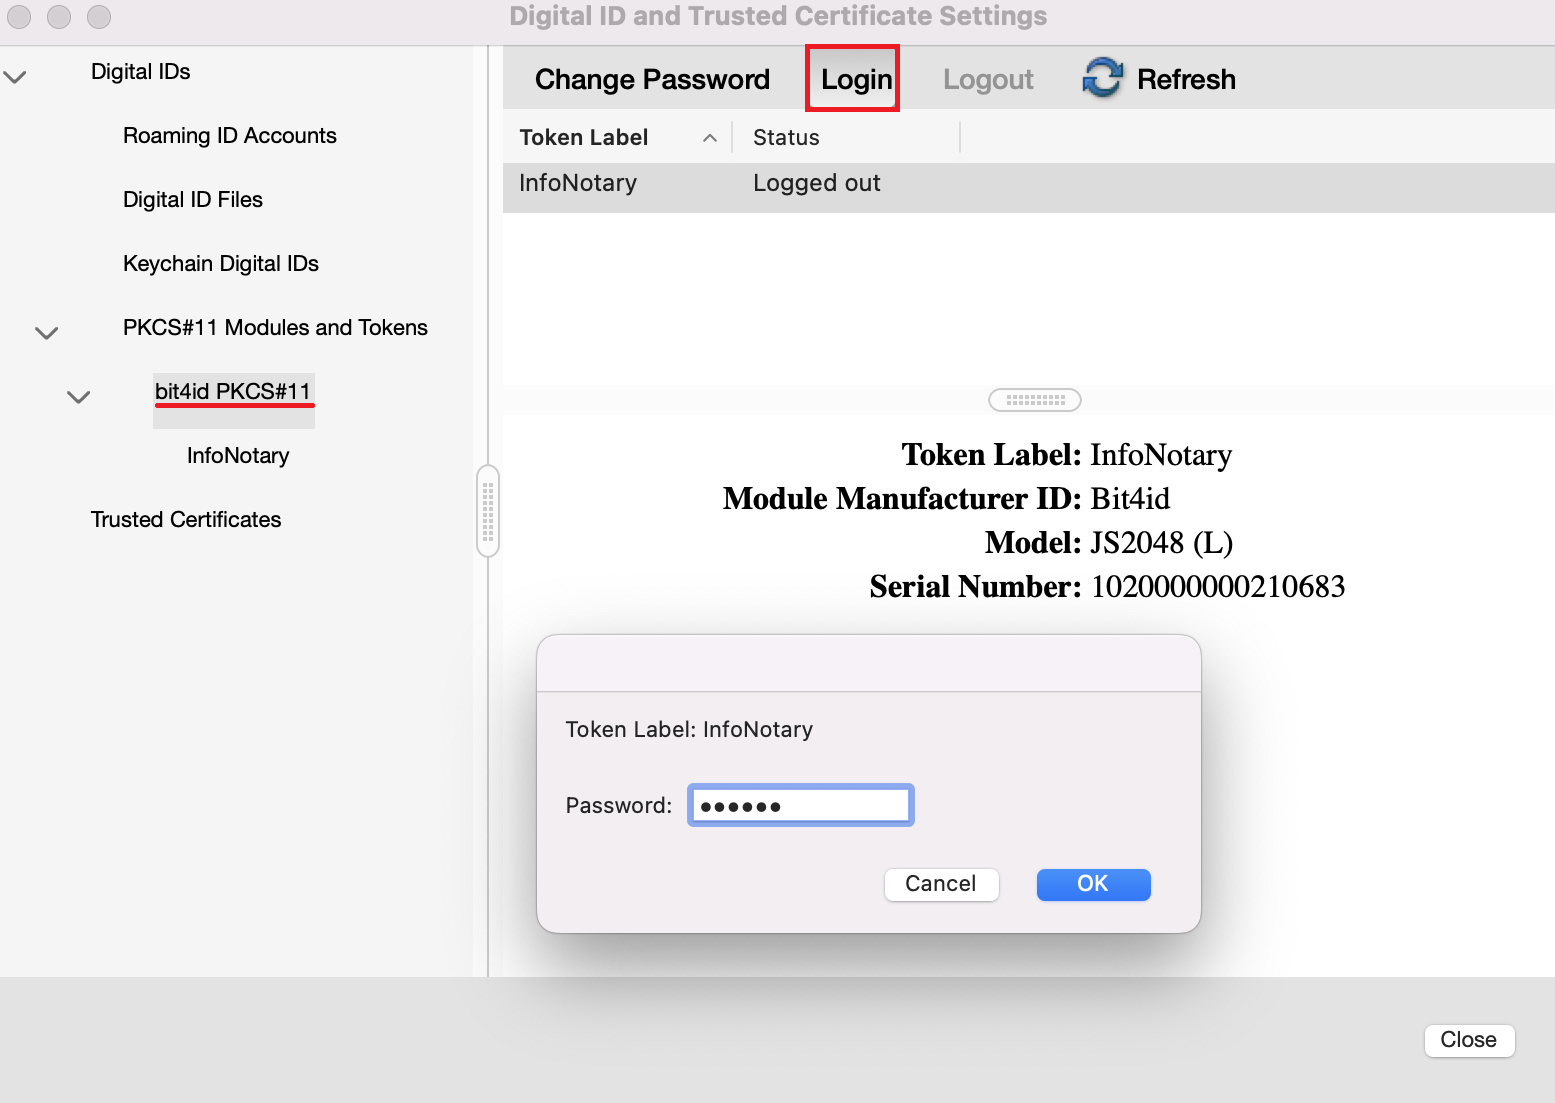
4. If set correctly, the model of your card will be displayed.
- Select your card and click Login. Dial your PIN to change the status to Logged in.
