Installation of smart card reader and smart card drivers in Windows: Разлика между версии
Направо към навигацията
Направо към търсенето
(Нова страница: The prefered way to install the drivers for the smart card reader and the smart card on MS Windows is through [http://repository.infonotary.com/install/PNPInstaller/PNPIns…) |
Редакция без резюме |
||
| Ред 1: | Ред 1: | ||
The prefered way to install the drivers for the smart card reader and the smart card on MS Windows is through [http://repository.infonotary.com/install/PNPInstaller/PNPInstaller.msi automatic installer for Infonotary]. The automatic installer defines what to install | The prefered way to install the drivers for the smart card reader and the smart card on MS Windows is through [http://repository.infonotary.com/install/PNPInstaller/PNPInstaller.msi automatic installer for Infonotary]. The automatic installer defines what to install depending on: | ||
* | * devices you have; | ||
* the version of the operating system; | * the version of the operating system; | ||
== Before you | == Before you begin == | ||
[[Image:warning.jpg|32px]] Before you start the installer make sure that your devices are inserted. | [[Image:warning.jpg|32px]] Before you start the installer make sure that your devices are inserted. | ||
| Ред 9: | Ред 9: | ||
Please keep in mind that: | Please keep in mind that: | ||
* In order to work the automatic installer requires an Internet connection; | * In order to work the automatic installer requires an Internet connection; | ||
* The process of the installation may take different amount of time, | * The process of the installation may take different amount of time, depending off your Internet connection. | ||
== Using InfoNotary PNP Installer == | == Using InfoNotary PNP Installer == | ||
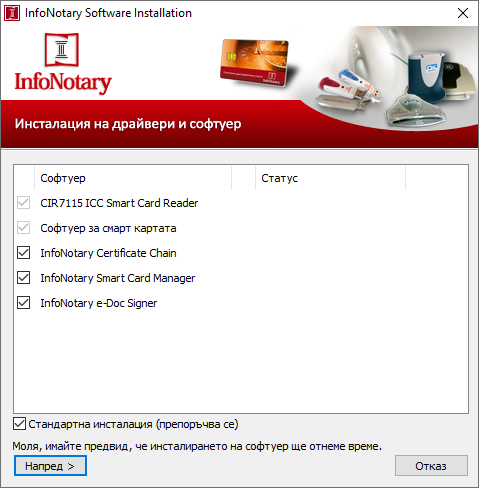
If Infontary PNP Installer is already installed you may start it from [Start]->All Programs->Infonotary->PNP Installer->Infonotary Software Installation. In case is not you can download it from | If Infontary PNP Installer is already installed you may start it from [Start]->All Programs->Infonotary->PNP Installer->Infonotary Software Installation. In case it is not installed, you can download it from | ||
[http://repository.infonotary.com/install/PNPInstaller/PNPInstaller.msi here]. | [http://repository.infonotary.com/install/PNPInstaller/PNPInstaller.msi here]. | ||
[[Файл:PNPInstaller.png]] | [[Файл:PNPInstaller.png]] | ||
If | If “Unattended setup” is checked it will install all the drivers and softwares. If you want to configure every application separately, please uncheck “Unattended setup” before clicking “Next >”. | ||
[[Категория:Инсталация и използване на удостоверения за електронен подпис]] | [[Категория:Инсталация и използване на удостоверения за електронен подпис]] | ||
[[Категория:Windows]] | [[Категория:Windows]] | ||
[[Категория:Помощ]] | [[Категория:Помощ]] | ||
Версия от 17:58, 25 февруари 2015
The prefered way to install the drivers for the smart card reader and the smart card on MS Windows is through automatic installer for Infonotary. The automatic installer defines what to install depending on:
- devices you have;
- the version of the operating system;
Before you begin
![]() Before you start the installer make sure that your devices are inserted.
Before you start the installer make sure that your devices are inserted.
Please keep in mind that:
- In order to work the automatic installer requires an Internet connection;
- The process of the installation may take different amount of time, depending off your Internet connection.
Using InfoNotary PNP Installer
If Infontary PNP Installer is already installed you may start it from [Start]->All Programs->Infonotary->PNP Installer->Infonotary Software Installation. In case it is not installed, you can download it from here.
If “Unattended setup” is checked it will install all the drivers and softwares. If you want to configure every application separately, please uncheck “Unattended setup” before clicking “Next >”.
